When conducting a penetration test (also known as a hack test) on a website, one of the first things that will catch my eye is the configured (or better, not-configured) security headers on the targeted website. Security headers are a [defense-in-depth](https://en.wikipedia.org/wiki/Defence_in_depth_(non-military)#Information_security) measure, in the form of response headers, that let the browser know what is allowed and what is not. Browsers will respect the rules defined by these headers and thereby protect visitors from client-side attacks and potentially leaking sensitive information.
When conducting a penetration test (also known as a hack test) on a website, one of the first things that will catch my eye is the configured (or better, not-configured) security headers on the targeted website. Security headers are a [defense-in-depth](https://en.wikipedia.org/wiki/Defence_in_depth_(non-military)#Information_security) measure, in the form of response headers, that let the browser know what is allowed and what is not. Browsers will respect the rules defined by these headers and thereby protect visitors from client-side attacks and potentially leaking sensitive information.
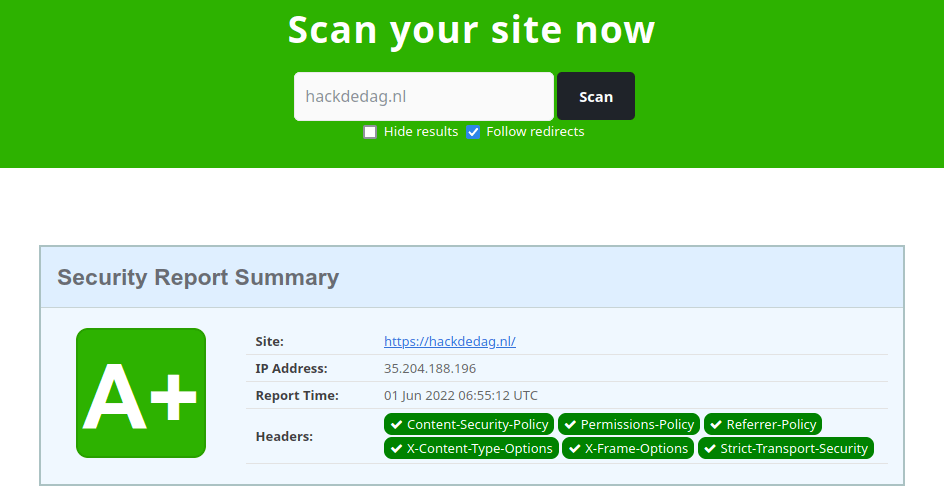
This post will tell you which security headers you should configure, why they are necessary, and how to do it. In most cases, these can simply be configured in your web server, so we will include Nginx configuration example rules, which you can simply copy-paste and enjoy. When you're done configuring your website, a great tool to verify your configuration and check your website's score is Security Headers (.com).
X-Content-Type-Options
Let's start with the so-called low-hanging fruit. The X-Content-Type-Options header has only one valid configuration: nosniff. It prevents your browser from guessing the Content-Type of the data it loads and only trusting the Content-Type header. If you are not setting the X-Content-Type-Options header, a downloaded file from your website might be interpreted as, for example, executable code.
add_header X-Content-Type-Options "nosniff" always;
This mostly poses a risk if your website hosts user-uploaded files, but since it is so easily configured, there's no reason not to use it.
X-Frame-Options
Another easy one is the X-Frame-Options header. This header denies the browser from loading your website in an iframe element on another website, protecting your visitors against clickjacking attacks. A clickjacking attack works as follows; an attacker frames your website on his own website but hides it with overlays and transparencies using CSS. This way, the attacker can make it seem like a visitor is clicking some buttons on his website but actually performing actions on your site (for example, changing its password or recovery e-mail address). There are two valid configurations, of which the most strict configuration is:
add_header X-Frame-Options "DENY" always;
Note: this header is obsolete if you are using
frame-ancestorselement in the Content-Security-Policy header but is still needed for older browsers *.
* Basically, the only browser version released since 2016 that doesn't support frame-ancestors is IE
Referrer-Policy
The Referrer-Policy header tells the browser what to include in the Referer (note the erroneous spelling) header. This way, you will prevent leaking sensitive information in the URL to third-party websites through the Referer header. The most strict way to configure it is:
add_header Referrer-Policy "no-referrer" always;
Another safe option, if you do want to include the origin in the referer, is:
add_header Referrer-Policy "strict-origin-when-cross-origin" always;
For a more extensive exploration of the options, I'd recommend reading: https://scotthelme.co.uk/a-new-security-header-referrer-policy/.
Strict-Transport-Security
The Strict-Transport-Security header informs the browser that it should use HTTPS and should not use HTTP anymore in the future. A good configuration is:
add_header Strict-Transport-Security "max-age=31536000; includeSubDomains" always;
If your website is HTTPS only and you want browsers to enforce this for you, look at HSTS preload.
Permissions-Policy
The Permissions-Policy header is a more recently introduced security header (previously Feature-Policy; introduced in 2018, renamed in 2020). It tells the browser which permissions it needs for the website's functionality. Permissions are features offered by the browser through an API. Using the Permissions Policy HTTP Header Generator I generated the following header, showing the most strict way to set it (based on standardized permissions):
add_header Permissions-Policy "accelerometer=(), ambient-light-sensor=(),
    autoplay=(), battery=(), camera=(), cross-origin-isolated=(),
    display-capture=(), document-domain=(), encrypted-media=(),
    execution-while-not-rendered=(), execution-while-out-of-viewport=(),
    fullscreen=(), geolocation=(), gyroscope=(), keyboard-map=(), magnetometer=(),
    microphone=(), midi=(), navigation-override=(), payment=(),
    picture-in-picture=(), publickey-credentials-get=(), screen-wake-lock=(),
    sync-xhr=(), usb=(), web-share=(), xr-spatial-tracking=()" always;
You can see why I'm not a big fan of this header yet; you have to specify every permission separately, and if any new ones are supported in new browser versions, you have to change your configuration. Unfortunately, there is no default, and therefore by default, a permission will be allowed by the browser if this header is not set.
A new permission is browsing-topics, this can be used to disable Chrome's new "feature" Browsing Topics. This subject needs some explanation, so more on this in another blog. For now, all you need to do to disable browsing topics is:
add_header Permissions-Policy "browsing-topics=()" always;
Content-Security-Policy
Last, but definitely not least, is the Content-Security-Policy header. This header tells the browser what content it is allowed to load. One of the main aims of this is to protect the user against Cross-site Scripting (XSS) attacks, but as said before, it is also used to prevent clickjacking and other types of attacks.
This header deserves a post on itself as it has many elements that can be configured. Therefore we'll make do with a safe example and a tool you can test and build up your own policy. I am also not completely satisfied with the current CSP header configured on this website, so some extra work on it might be necessary.
Below is a safe example, but note that you'd need to configure your own nonces and, if desired, a report endpoint.
add_header Content-Security-Policy "script-src 'strict-dynamic' 'nonce-rAnd0m123'
    'unsafe-inline' http: https:; object-src 'none'; base-uri 'none';
    require-trusted-types-for 'script'; report-uri https://csp.example.com;"
    always;
This example comes from Google's CSP evaluator, which you can use to evaluate your policy and solve any problems and risks it might give.
Note: You may have noticed the
report-urielement in the example. This can be used to report violations of the policy. If you're implementing a policy for the first time, you can also make use ofContent-Security-Policy-Report-Only, which will not block anything but only report violations (and therefore not break anything), so you can fix your website before enabling the actual filter.
Conclusion and warning
After configuring all these headers, we used Security Headers (.com) to get the result shown in the banner image. But be careful; configuring security headers on your website doesn't mean that you don't need to pay attention to any vulnerabilities in your code! These headers will only prevent a large number of attacks from escalating, but in the end, it all depends on the browser your visitors are using. If your website is vulnerable to any client-side attacks, security headers are literally your last resort. So, configure your web server using the above instructions and let your visitor's browsers do the rest.