
Let's assume that you want to build an embedded device that stores some sensitive data, like cryptographic keys, but which also interfaces with the outside world via USB or wireless; Any vulnerability in the communication code could provide attackers with an attack vector to access the secrets on the device. In this blog post, we'll show how ARM's TrustZone-M can help protect these secrets by creating a secure enclave on the device.
Let's assume that you want to build an embedded device that stores some sensitive data, like cryptographic keys, but which also interfaces with the outside world via USB or wireless; Any vulnerability in the communication code could provide attackers with an attack vector to access the secrets on the device. In this blog post, we'll show how ARM's TrustZone-M can help protect these secrets by creating a secure enclave on the device.
This blog post is quite extensive and starts with a comprehensive overview of the security features. If you are already familiar with the usual ARM security features, you can skip to 'TrustZone-M explained'. If you are also already familiar with how TrustZone-M works, feel free to jump into the minimal working example directly!
Contents
- Embedded security before TrustZone-M
- TrustZone-M explained
- Minimal working example on the Raspberry Pi Pico 2
- Pain points
- Goals and next steps
Embedded security before TrustZone-M
In embedded development, we are usually in control of all code running on the device. However, especially when working with chips containing wireless capabilities (e.g., Wi-Fi or BLE), it is not always possible to thoroughly inspect the driver library for all hardware. It would be nice to sandbox the communication, and other non-critical code. That way, the critical code (e.g., handling cryptographic keys) is better protected from any potential bugs or backdoors in these libraries.
However, most embedded hardware does not have the hardware capabilities to enforce this separation. Historically, any code code running on an embedded platform had the capability to read and write any memory address in the entire memory map, allowing for arbitrary data access and the control of all peripherals. A solution would be to have a separate chip on the PCB to handle the secure data, but that would increase the Bill of Materials and thus cost and complexity.
On modern ARM Cortex-M hardware (the most common family of embedded processors), the device has access to two privilege modes: unprivileged and privileged. Privileged software can access all system resources, while unprivileged software is restricted in what it can access. This is device-specific and non-changeable. For example, unprivileged software cannot access system registers, change the exception/interrupt settings, or change the MPU (explained next) configuration. To get from unprivileged to privileged mode, the SVC instruction is used to perform a so-called supervisor call. The supervisor checks what the unprivileged code wants the privileged code to do, and chooses weather to allow or disallow this.
In addition to the privilege levels, ARM Cortex-M23 and M33 processors have a memory protection unit (MPU). This is a piece of programmable hardware inside the chip (only programmable in privileged mode), which is used to divide the memory into several regions. For each region, the programmer can decide if unprivileged code is allowed to read, write, and/or execute code at those memory addresses. However, most chips have only 8 programmable regions, which is often not fine-grained enough to guard code regions and split off peripherals (like wireless capabilities). In theory, the MPU is an optional part of the chip, but in practice, almost all Cortex-M33 chips include this peripheral.
TrustZone-M explained
TrustZone-M is a security extension to the Cortex-M family of microcontrollers -- an extra tool in the programmer's toolbox to improve the security capabilities of the chip. It allows for more gradual control over which resources are protected than the MPU does.
We'll explain how it works, and what works well and less well when using TrustZone-M in Rust. We'll also introduce our quick-start repository for using TrustZone-M on the Raspberry Pi Pico 2.
The secure and non-secure world
TrustZone-M separates the code running on the chip into a so-called "secure world" and a "non-secure world". The code regions are specified in the security attribution unit (SAU), a peripheral only present in TrustZone-M chips. The secure world has permissions to access all parts of the chip, although the exact behaviour differs between chip manufacturers. Some parts of code and data can be designated as non-secure. When the chip is executing code from that region, it is in non-secure mode. In that mode, only non-secure data can be accessed. The intended way to use this functionality, is to run most code in the non-secure world, with a small, carefully vetted codebase running in the secure world to store/handle sensitive material, like cryptographic keys.
The two worlds do not live completely separately. As stated, the secure world has full permissions, and it can thus freely access non-secure resources. The non-secure world, in turn, cannot access secure resources, to protect them from unauthorized access. The only way to transition from the non-secure to secure world, is through non-secure entry functions. These are secure functions, that live in the secure world. The non-secure world can call these functions, but it must do so indirectly by transitioning through the non-secure callable region of memory. This is a special subsection of secure memory. Only if the non-secure world jumps into this piece of memory, and executes the SG (secure gateway) instruction in there, does the chip change from non-secure to secure mode. Because this section of memory is technically part of the secure memory, the non-secure world cannot write to it. This way, the secure world can guarantee that this section contains only 'safe' entries into the secure world. These entries are called veneers in ARM terminology.
Caveats
The non-secure world cannot access secure memory. Data could still leak between the two worlds via the registers, since these are not banked (apart from the stack pointer register). Data leaks could happen if any (secret) data is left in a general purpose register when returning to the non-secure world.
This means the secure world must zeroize or otherwise clear all registers it used before returning to non-secure code to avoid leaking secrets via remaining data (e.g., part of a cryptographic key left in r0). The compiler can do this for you using the (close to stabilization) CMSE calling conventions feature, but there are still some things you should be careful of. For example, it is possible to share pointers over the boundary, but the secure world should carefully check if the pointer and all data it points to are part of the non-secure memory. To do this, ARM provides the TrustZone-M instruction TT to Test the Target address. The pointer should also be checked for non-null and correct alignment.
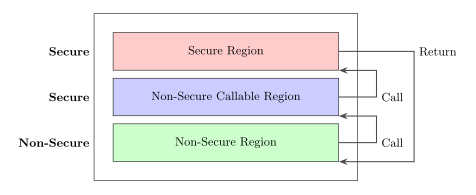
Image 1: Method for calling a secure function from the non-secure world.
Minimal working example on the Raspberry Pi Pico 2
In a previous blogpost, Dion wrote a set of tools to use TrustZone-M with Rust code. In the meantime however, Rust support for TrustZone-M has improved and is, in fact, nearing stabilization, currently residing in the nightly branch (the RFC can be tracked here). It is now easier to run, and the application looks more like any other embedded Rust project.
So, time for a new 'how-to'!
We’ve created an open-source quick-start repository for using TrustZone-M on the Raspberry Pi Pico 2. Simply clone it and get started with TrustZone-M on the Raspberry Pi Pico 2; it contains the code I wish I had had when I started this project.
I'll walk you through the steps below.
The necessary nightly features are abi_cmse_nonsecure_call and cmse_nonsecure_entry. The first is used to tell the compiler suite to generate a branch from the secure world to the non-secure world. The latter is used to tell the compiler suite to generate a branch from the non-secure world to the secure world, by generating the veneer and placing it into the non-secure callable region.
Splitting the resources and setting up the SAU
One of the main things to keep in mind when programming for TrustZone-M, is that there are two separate binaries: one for the secure world, and one for the non-secure world. Both worlds have their own memory.x file, instructing the linker to place the code and memory at the correct address:
/* in `app-s/memory.x` */
MEMORY
{
    /* first half of flash */
    FLASH     : ORIGIN = 0x10000000, LENGTH = 1024K
    /* first half of RAM  */
    RAM       : ORIGIN = 0x20000000, LENGTH = 256K
}
/* in `app-ns/memory.x` */
MEMORY
{
    /* second half of flash */
    FLASH : ORIGIN = 0x10100000, LENGTH = 1024K
    /* second half of RAM  */
    RAM   : ORIGIN = 0x20040000, LENGTH = 256K
}
The secure and non-secure worlds must not overlap in memory. Here, we split the Pico 2’s 2MB flash and 512KB RAM equally, but this can be adjusted based on your needs. This leads to the following memory map for the applications:
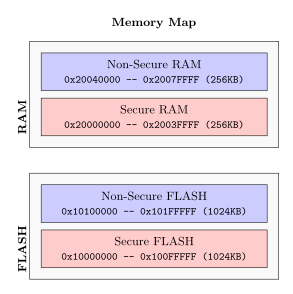
Image 2: Memory map showing secure and non-secure FLASH and RAM
After a reset, the chip starts in secure mode, and starts executing the code at address 0x10000000. This is where cortex-m-rt places the reset vector, which then executes the secure main() function. At the very least, the secure world should set up the security attribution unit (SAU), which specifies which parts of memory are secure and non-secure. The SAU is set up as follows, the addresses must be the same as in your memory.x files:
// Set up SAU: Non-Secure Flash, RAM, and NSC (Veneers) region
sau.set_region(0, SauRegion { base_address: 0x10100000, limit_address: 0x101FFFFF, attribute: SauRegionAttribute::NonSecure }).unwrap();
sau.set_region(1, SauRegion { base_address: 0x20040000, limit_address: 0x2007FFFF, attribute: SauRegionAttribute::NonSecure }).unwrap();
sau.set_region(2, SauRegion { base_address: base_nsc, limit_address: limit_nsc | 0x1F, attribute: SauRegionAttribute::NonSecureCallable }).unwrap();
sau.enable();
Enabling SecureFaults
Also, even though not strictly required, it is helpful to enable the SecureFault in the System Control Block (SCB) to generate relevant exceptions (instead of a HardFault) if the non-secure world tries to access memory it is not allowed to. That way, it is easier to detect a non-conforming non-secure world.
Setting up access to the peripherals
Lastly, the secure world should set up the ACCESSCTRL (section 10.6 in the datasheet), specifying which peripherals the non-secure world can access. Even though these are memory-mapped, the SAU does not have control here; the ACCESSCTRL register does. This register is specific to this chip (the RP235x).
Jumping into the non-secure world
Then, it is finally time to jump into the non-secure world. To do this, we use the support built in to the cortex-m crate.
let ns_vector = 0x10100000usize as *const u32; // start of non-secure flash
let scb_ns = core_peripherals.SCBNS; // non-secure system control block (SCB)
unsafe { cortex_m::asm::bootload_ns(ns_vector, scb_ns) };
This function sets the reset vector in the non-secure SCB and loads the non-secure stack pointer value into the non-secure stack pointer register. The compiler finally generates a function call using a BLXNS (Branch with Link and Exchange to Non-Secure) instruction, as opposed to a 'normal' branch instruction to the address in the reset vector.
Calling secure world functions from the non-secure world
To call into the secure world, we declare non-secure-callable functions in the secure world:
// secure-world-app/src/nonsecure_entry.rs
#[unsafe(no_mangle)]
pub extern "cmse-nonsecure-entry" fn nsc_timer(ms: u32) {
    hprintln!("Secure timer called by the non-secure world!");
    // timer code (not shown here for brevity)
}
And declare the prototype in the non-secure world:
// non-secure-app/src/main.rs
unsafe extern "C" {
    unsafe fn nsc_timer(ms: u32);
}

// Usage
unsafe { nsc_timer(1000); }
The linker generates a veneer for the non-secure callable region (.gnu.sgstubs section):
10017ea0 <nsc_timer>:
10017ea0:    e97f e97f     sg      ; Secure Gateway: transition to secure
10017ea4:    f7e8 be57     b.w    10000b56 ; Jump to implementation
Before returning to non-secure code, the compiler clears registers to prevent data leaks:
10000ba6:    4670          mov     r0, lr   ; Clear r0-r3
10000ba8:    4671          mov     r1, lr
10000baa:    4672          mov     r2, lr
10000bac:    4673          mov     r3, lr
10000bae:    46f4          mov     ip, lr   ; Clear ip
10000bb0:    f38e 8800     msr     CPSR_f, lr ; Clear flags
10000bb4:    4774          bxns    lr     ; Return to non-secure
The non-secure world calls these using a normal BL instruction, which the processor routes through the veneer.
Pain points
There are several challenges when developing TrustZone-M code in Rust. These are explained below.
We are working on solving these challenges, more on that in another blogpost!
Challenge 1: Flashing
As mentioned, working with TrustZone-M will mean working with two completely separate binaries. These two binaries both need to be flashed onto the embedded device, which is not ideal.
On a high-level, the process is as follows:
- Build the secure binary
- Build the non-secure binary
- Flash the non-secure binary
- Flash & run the secure binary
If the memory.x files are specified accordingly, the linker places both binaries in distinct memory regions. When flashing, probe-rs takes these addresses into account and flashes both binaries to the correct spots. It only overwrites the memory it will flash, which allows us to flash the two binaries completely separately.
The order of building is important: the non-secure binary needs the up-to-date object file with the addresses of the non-secure callable veneers. The order of flashing is less important, but since the chip boots into the secure world, it made sense to 'attach' to this part, in order to more easily spot any early errors. The semihosting print statements from both worlds end up in the same stream anyway.
In the ideal situation, we would be able to combine the two separate binaries into one. This would help greatly when debugging. This is an interesting area to look into in the future.
Challenge 2: Debugging
Similarly to above, debugging the two separate binaries is not ideal. Using the debugger, we must basically choose whether we want to debug either the secure or the non-secure binary, because probe-rs needs to know the binary it is debugging, and it cannot deal with two binaries.
The process is as follows:
- Flash secure||non-secure binary
- Flash & debug non-secure||secure binary
Challenge 3: Code duplication
Even though the two binaries are almost completely separated, there is some interaction between them. This is done by the non-secure world calling into the secure world via the non-secure entry functions (designated as pub extern "cmse-nonsecure-entry"). These end up in an object file, so the non-secure binary knows where to find these functions. However, the code also needs a function prototype, which is included in the non-secure source code as follows:
unsafe extern "C" {
    unsafe fn nsc_function(a: u32) -> u32;
}
This is currently done manually by copying the non-secure entry function prototypes from the secure to the non-secure source code. Ideally, we would like this to be more ergonomic. One way to do this would be with a procedural macro. This would allow us to annotate all non-secure entry functions as #[generate_prototypes], and then have only one line at the top of the non-secure source code (e.g. include!(concat!(env!("OUT_DIR"), "/prototypes.rs"))) negating the need to keep manually updating them.
Goals and next steps
To bring everything together, we are working on a proof-of-concept demo application, namely a simple hardware secure module (HSM) which can be used to securely sign, encrypt and decrypt data, and generate 2FA codes.
Stay tuned for a follow-up blog post about the demo!