LoRaWAN Applications in Rust
Last September, at the start of my internship at Tweede Golf, my tutors gave me a LoRa-E5 Dev Board. My task was to do something that would make it easier to write applications for this device in Rust. Here's what I did.
The LoRa-E5 Dev Board is a prototyping board for LoRa applications. It features the STM32WLE5JC LoRaWAN transceiver. Check out this previous blog post for more info on LoRa!
Problem
Rust doesn't have stable libraries that make it easy to develop LoRa applications yet. The Hardware Abstraction Layer (HAL) of the STM32WLE5JC allows full control over the LoRa transceiver, so you could send your messages with it directly. But that's not exactly easy to do, and it becomes a real pain if you want to follow a specific protocol, such as LoRaWAN. Writing a communication stack is a lot of work, and using the HAL directly also means you have to rewrite your code if you decide to switch to another board. All in all, this is not a great fit.
I wanted to make it easier to write LoRaWAN applications for the LoRa-E5 Dev Board, but also for any other LoRa boards. The rust-lorawan repository contains two crates that aim to do just that:
lorawan-encoding, which allows you to easily generate and parse LoRaWAN packetslorawan-device, which abstracts the details of the LoRaWAN protocol and the hardware you are using, and provides a high-level API to send and receive messages
Internally, lorawan-device uses traits that describe transceiver behavior, and expresses its own functionality in
terms of those traits. As a result, you can use this library with any device of which the HAL implements these traits.
This is great in theory, but there are two problems with lorawan-device:
- The traits it uses are internal. Most embedded software in Rust follows the example of
embedded-hal: there is one crate that mostly contains traits, and other crates either provide implementations of those traits, or describe the functionality they need in terms of those traits. That way, all those crates are compatible with each other. It would be easier to convince HAL maintainers to implement traits from a specialized radio trait crate, which can be used by any library that makes use of radios, rather than ask them to implement the traits oflorawan-devicespecifically. - It's experimental. There is no documentation, it's difficult to get it working, and the exposed API can be quite confusing. I spent a lot of time trying to set this up, but I didn't manage to get it working at all. I had to conclude that this crate is not yet suitable for real-world usage.
Other than that, there are no promising open-source Rust initiatives related to the LoRaWAN protocol. The ecosystem needs a few changes to make it easier to develop LoRaWAN projects.
Planned Solution
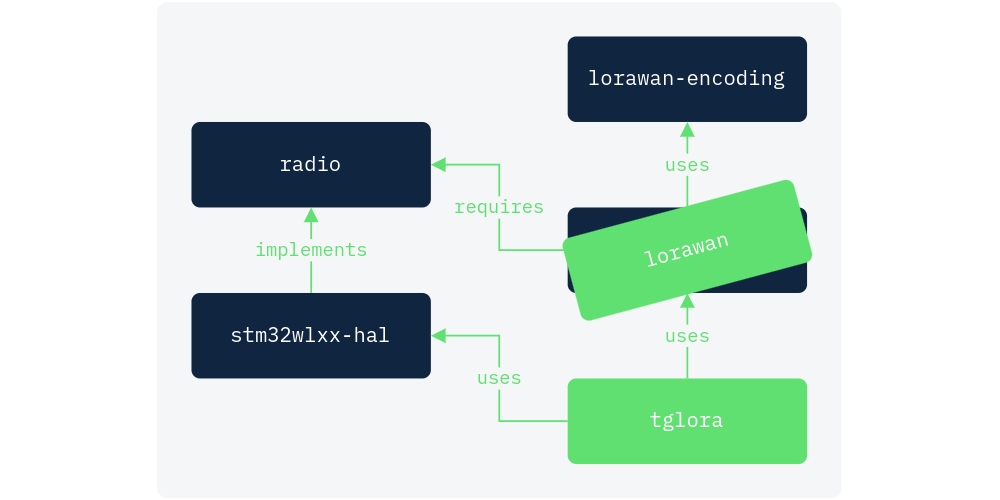
While browsing for relevant libraries, I found that Rust's initial LoRaWAN ecosystem looks like this:
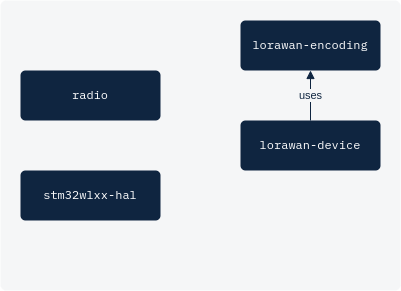
On one end, we have the aforementioned lorawan-encoding and lorawan-device crates. They form an abstraction layer
over the LoRaWAN protocol, but are difficult to use and likely require the user to implement their traits before they
can use it. On the other end, we have the HAL crate of the LoRa board (not necessarily the stm32wlxx-hal), which forms
an abstraction layer over the hardware. There is also radio, an embedded-hal-like crate filled with traits related
to radio behavior. It is currently only used in a few of its maintainer's own projects, but it's under active
development and already showing great potential.
To make LoRaWAN applications more approachable in Rust, I wanted to adapt this picture to look more like this:
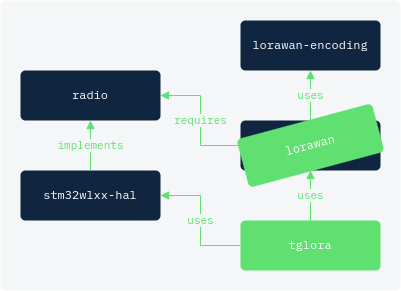
This requires a few adaptations, namely:
- Creating an alternative crate for
lorawan-device:lorawan. It will express the required transceiver functionality in terms ofradiotraits. We can reuse thelorawan-encodinglibrary, that saves a lot of work. - Implementing the
radiotraits for the HAL crate. - Making a demo project
tglorato demonstrate how simple it is to create LoRaWAN applications with these adaptations
Implementation
lorawan
A LoRaWAN abstraction layer requires three things: a precise timer, a (pseudo-)random number generator, and a
transceiver to actually send and receive messages. Internally, the LoRaRadio struct combines each of these:
pub struct LoRaRadio<RXTX, TIM, RNG> {
    radio: RXTX,
    tim: TIM,
    rng: RNG,
}
It features the lorawan_transmit method to transmit a message following the LoRaWAN protocol:
- Switch to the right transmission channel and data rate
- Transmit the message
- Switch to a random RX1 frequency with the right data rate
- Wait for one second
- Listen for a message
- If there is no response:
a) Switch to the RX2 frequency with the right data rate
b) Wait until two seconds after transmission
c) Listen for a message again - Optionally return the message
This method uses the trait bounds on the type parameters of the LoRaRadio struct for the hardware functionality.
RXTX has to implement the radio traits, TIM the DelayUs trait from embedded-hal, and RNG the RngCore
trait from rand_core. Ideally, whichever HAL you are using will already have peripherals for each of these. This is
not currently the case for radio traits, but hopefully it will be in the future.
This crate's public API features the Device struct to wrap LoRaRadio:
pub struct Device<RXTX, TIM, RNG, STATE> {
    radio: LoRaRadio<RXTX, TIM, RNG>,
    state: STATE,
}
A Device can be used to transmit messages over LoRaWAN, but only if its STATE is Session, which indicates that the
device has properly joined a network. Attempting to transmit a message from a device that hasn't joined a network will
result in a compile-time error.
The GitHub repository for this library can be found here. Any feedback is much appreciated!
stm32wlxx-hal
Implementing the radio traits for the peripherals in the HAL is quite straightforward if you know what you're doing. I
didn't know what I was doing. Thankfully, Alex — the maintainer of stm32wlxx-hal — was
kind enough to help me out. The actual trait implementations will be wildly different for other HALs, but we'll go over
what each trait does in general. We have to implement four traits in total: Transmit, Receive, Busy, and Channel
.
Transmit and Receive are quite simple, they only need the right packet parameters to work. For an example take a
look at the pull request here.
The Busy trait indicates whether the transceiver is currently busy receiving a valid packet. The LoRaWAN protocol
involves listening on two different channels for a response, with a one-second delay in between. However, receiving
LoRaWAN packets can take longer than a second, and we mustn't switch to the second channel if a valid packet is being
sent to the first. As long as is_busy yields true, the radio will keep listening on the same channel.
Implementing Channel takes most of the work:
pub trait Channel {
    type Channel: Debug;
    type Error: Debug;

    fn set_channel(&mut self, channel: &Self::Channel) -> Result<(), Self::Error>;
}
The set_channel method should set up the radio to use the specified modulation type, as well as all necessary
parameters for that type of modulation. That would include frequency, bandwidth, and spreading factor in the case of
LoRa. To implement this trait for our own type, the radio crate expects us to follow the following pattern.
Since radios often support multiple modulation types (LoRa, GFSK...), the Channel associated type should be an enum
wrapper around all of them, each with a struct that contains the modulation-specific parameters:
#[non_exhaustive]
pub enum Sx126xChannel {
    /// LoRa modulation.
    LoRa(radio::modulation::lora::LoRaChannel),
}
Sx126xChannel should implement From<LoRaChannel>, as well as From for any other supported modulation types:
impl From<LoRaChannel> for Channel {
    fn from(channel: LoRaChannel) -> Self {
        Channel::LoRa(channel)
    }
}
This allows crates such as lorawan to use LoRaChannel internally, and transform it into the
expected Sx126xChannel with into:
impl<RXTX, ERR, CH> LoRaRadio<RXTX, ERR>
    where
        RXTX: Channel<Channel=CH, Error=ERR>,
        CH: From<LoRaChannel>,
{
    pub fn set_channel(&mut self, channel: LoRaChannel) {
        self.radio.set_channel(channel.into())
    }
}
Other than that, the set_channel implementation is basically a match over the supported modulation types. the HAL is
used to properly configure the radio for each specific case.
Using an enum for modulation types and converting with the From trait works fine, but it introduces a lot of
boilerplate code. Personally, I would prefer a parameterized Channel<M> trait, where M is the modulation type. That
way, you can split the match arms into different impl blocks, and an enum wrapper and From implementations
wouldn't be necessary. This is still up for discussion, feel free to join
in here!
tglora
Now it's time to see the ecosystem adaptations in action! We start by creating the LoRaRadio. This will be a bit
different depending on the board you use, but it should look something like this:
let radio = cortex_m::interrupt::free(|cs| {
    let mut dp: pac::Peripherals = defmt::unwrap!(pac::Peripherals::take());

    let gpioa = PortA::split(dp.GPIOA, & mut dp.RCC);
    let dma = AllDma::split(dp.DMAMUX, dp.DMA1, dp.DMA2, &mut dp.RCC);

    let radio = Radio::new(dp.SPI3, dma.d1.c1, dma.d2.c1, &mut dp.RCC);
    let tim2 = Tim2::new(dp.TIM2, & mut dp.RCC);
    let rng = Rng::new(dp.RNG, Clk::MSI, &mut dp.RCC);

    LoRaRadio::new(radio, tim2, rng)
});
We will also need LoRaWAN credentials. You can get these from any LoRaWAN network provider. In this case, I'm using The Things Network, which is free of charge and may already have registered LoRaWAN gateways in your area.
let credentials: Credentials = Credentials::new(APP_EUI, DEV_EUI, APP_KEY);
We can combine these to create a Device:
let device = Device::new_otaa(radio, credentials);
OTAA (Over The Air Activation) is one of the two supported LoRaWAN end node activation modes. It involves exchanging numbers with the network server to derive session keys. Alternatively, you can use ABP (Activation By Personalization) and inject session keys directly into the network and end node. OTAA is the recommended approach, as it allows you to refresh session keys when necessary.
The device we just created through OTAA is not connected to a network yet. As explained earlier, if we try to transmit a
message with it, it will give a compile-time error. We first need to join the network with the join method:
let device = device.join::<EU868>()?;
The type in the turbofish indicates which frequency plan it should use. I live in Europe, so I
chose the EU868 band, which is currently the only one that's supported. Fortunately, adding support for other
frequency plans is trivial. You only have to copy the numbers from
this webpage.
Almost there! The next step is to configure the device to exhibit class A behavior. LoRaWAN supports three classes of end node behavior:
- class A will only listen for received messages right after it transmits one
- class B will also periodically listen during specified time slots
- class C listens all the time (unless it is currently transmitting)
lorawan only supports class A for now, but this should change in the future. In the meantime, we explicitly
indicate that we want a class A device:
let device = device.into_class_a();
Now, all there is left to do is send a message. A properly configured device features the transmit method, which
transmits the message in the first parameter, and stores the optional response in the second:
let mut buf = [0; MAX_PACKET_SIZE];

match device.transmit("Hello, world!".as_bytes(), &mut buf)? {
    Some((size, _)) => defmt::println!("response: {:?}", buf[0..size]),
    None => defmt::println!("no response"),
}
And there you have it, a LoRaWAN application with just a few lines of code. I have to admit that this looks a bit better than it currently is because there are still a few timing issues that I have yet to iron out. But, it's a proof of concept, and I'm happy with how it turned out.
The demo project can be found in this repository. It also contains a simple program that retrieves the messages sent by the end node from The Things Network, feel free to use it for any purpose. If you have any feedback or suggestions, I'd love to hear it!