TrustZone, trials and tribulations

TrustZone-m is a technology by ARM that allows you to create a Trusted Execution Environment (TEE) in your software. You can use it for example to keep your encryption keys secret or to separate a big vulnerable networking stack from your own code.
Over the last three months I've been working on a set of crates (Rust libraries) with the aim of making the usage of TrustZone-m a lot easier.
After all, we love contributing to the open source embedded Rust ecosystem. We were able to do this with a grant from the Dutch government.
Check out the project at:
What has been released does work, but at least as of writing it's a fairly minimal implementation. More about that at the end of the post.
This blog post is quite long and that's because it covers three things:
- The announcement
- An in depth look into TrustZone-m
- An overview of the development process
So what does this project actually do? Well, using TrustZone is pretty annoying so I wanted to make it more accessible. There is a lot of manual setup required and it's tricky to get right.
With what I've made using TrustZone generally looks like this:
// Secure app

// Sadly, we need to depend on some nightly features,
// but at least they exist!
#![feature(abi_c_cmse_nonsecure_call)]
#![feature(cmse_nonsecure_entry)]

// We let the build.rs build some bindings that we can include here
include!(concat!(env!("OUT_DIR"), "/trustzone_bindings.rs"));

#[cortex_m_rt::entry]
fn main() -> ! {
    // Initialize trustzone.
    // This also initializes the .DATA & .BSS sections of the nonsecure app
    trustzone_m_secure_rt::initialize();

    // Call a non-secure function through the generated bindings
    trustzone_bindings::write_thing(5);
    // The non-secure added `return_5` and then used `double`
    // on the value that we passed. So (5+5)*2 = 20
    assert_eq!(trustzone_bindings::read_thing(), 20);

    exit()
}

// Custom attribute that generates everything required for
// calling this function from the nonsecure app
#[nonsecure_callable]
pub extern "C" fn return_5() -> u32 {
    5
}

#[nonsecure_callable]
pub extern "C" fn double(x: u32) -> u32 {
    x * 2
}
// Nonsecure app

// We let the build.rs build some bindings that we can include here
include!(concat!(env!("OUT_DIR"), "/trustzone_bindings.rs"));

static mut THING: u32 = 99;

#[secure_callable]
pub extern "C" fn write_thing(val: u32) {
    unsafe {
        THING = trustzone_bindings::double(
            val + trustzone_bindings::return_5()
        );
    }
}

// Custom attribute that generates everything required for
// calling this function from the secure app
#[secure_callable]
pub extern "C" fn read_thing() -> u32 {
    unsafe { THING }
}
If you already know what TrustZone does, then you can go ahead and try it out! But if you don't or if you want to know more about the process of making this project, then please read on.
So what is TrustZone-m?
When I talk about TrustZone here I really mean the 'm' variant that is made for the Cortex-m microcontrollers.
On a high level TrustZone divides firmware into a secure and a nonsecure side. The nonsecure cannot access anything that is secure. This allows you to do some interesting things.
For example you could let your secure side know about the security keys and just expose a function that lets the nonsecure side encrypt some data with the secret key. That way the key itself is never exposed, but you can still use it.
The nonsecure side can then be more relaxed about security concerns. It's not that you shouldn't care anymore of course, but the risks are lowered a lot. An example of what you might want to run as nonsecure is a Bluetooth stack or another outwardly-facing complex (network) stack that deals with unknown input. Bugs are known to exist in these stacks and it's something you have to deal with, especially when you have a device in the field that doesn't support firmware updates.
In practice what you see is that the secure side is often pretty small and comes in the form of a secure bootloader and that the nonsecure side is the normal application. This is mainly done to limit the amount of interaction you have to have with TrustZone. The bootloader will simply configure (almost) the entire chip as nonsecure.
This leaves a lot of potential on the table. The security setup could be a lot more fine-grained and effective if not the entire firmware is nonsecure but only the dangerous foreign stack is.
Part of me starting this project was the idea that if using TrustZone were easier, we would make more fine-grained use of it (or even use it at all) which would improve the security of devices, which is definitely a thing in the minds of a lot of people and policymakers right now.
Let's go deeper
TrustZone for Cortex-m is based on memory regions and the configuration of them.
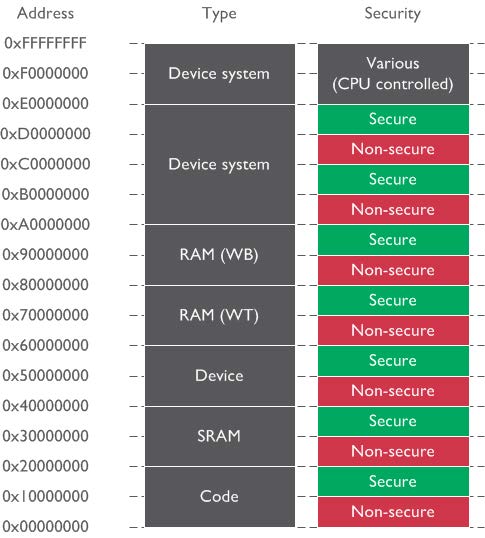
In principle everything is divided in secure and nonsecure: Code, memory and even peripherals.
This is also what's different to how the bigger older brother TrustZone-a works. TrustZone-a can switch from nonsecure to secure by making a Secure Monitor Call (SMC). This is comparable to making a system call.
In TrustZone-m we make the switch by making an elaborate function call, no interrupts required.
Secure to nonsecure
The simplest switch is the one from secure to nonsecure. Devices with TrustZone provide a couple of new instructions., one of which is the BLXNS instruction (Branch Link eXchange NonSecure) that lets us jump to a nonsecure function. Three things will happen when the instruction is executed:
- The secure return address is pushed on the secure stack.
- The MCU context is switched from secure to nonsecure. That means that we're now using a different stack pointer.
- The
LR(link register) that keeps track of where we're coming from is set to the specialFNC_RETURNvalue.
One precaution still needs to be taken though because if this were all that happened, then data could be leaked through the registers. So before the BLXNS is executed we must make sure our registers are empty aside from the function parameters. Luckily we can ask the compiler to do that for us by using a function attribute.
Another note is that we can't share a lot with the function through the parameters. Normally the bigger objects that we pass to a function are stored on the stack, but that would be the secure stack that the nonsecure function cannot access. So that's definitely a restriction.
The nonsecure function, though, can do its thing without caring that it was called from a secure function. When the function is done it can return by branching to the value in the LR register using the normal branch instruction. This is the same as for any normal return and even returns from interrupt.
The hardware will spot that it is returning to the special value that was stored which will make it switch back to the secure state.
Start reading this image at the secure side

A challenge here which this image does not convey is that you need to somehow know where the function is located in memory and what its signature is. We'll get to that later.
Nonsecure to secure
The reverse switch is a bit more elaborate and here we discover there is a third security state that is called 'nonsecure-callable' (NSC).
To make the switch from nonsecure to secure, the nonsecure code must jump to a secure function. That function must start with the new SG (Secure Gate) instruction. When that instruction is hit the MCU will make the switch to the secure state.
But what is the nonsecure-callable for then? Well, the SG instruction must be in an NSC region. Let's say that our secure app has a key or some other (semi)random data stored in ram or flash. There is a chance that one bit of data has the same value as an SG instruction. If someone can find that that is the case, then it might lead to a privilege escalation bug or a data leak of some kind.
So that's why ARM invented this third kind of region. It should not contain any data. It's used to only store the SG instruction after which there is only a branch to the 'real' secure function. Often the term 'veneer' is used for this.
Start reading this image at the nonsecure side
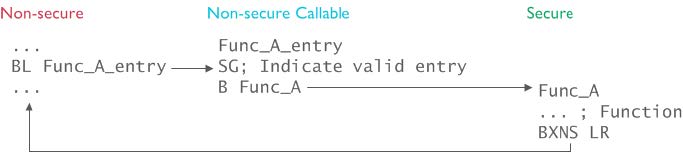
The secure side can return using the new BXNS instruction and has to make sure it doesn't leak any data via the registers again.
There is also support for a mixed set of secure and nonsecure interrupts. That all works fine, but I won't go into that now.
How to configure TrustZone
There are at least two, maybe three, different new components depending on which chip you're using.
The IDAU (Implementation Defined Attribution Unit)
This is mostly not visible directly to the user of a chip. Basically this is a component that actually does all the security checks. It has a list of memory regions and their security configuration.
A manufacturer can hardcode some regions into this as well, but usually there are configurable regions as well. (See the next two chapters)
The SAU (Security Attribution Unit)
The SAU gives us a cross-platform way to define regions and assign them the NS, NSC or S security attribute. Well... kind of. See the next chapter.
The manufacturer decides how many configurable regions you get.
By default the SAU is not active which means that everything is forced to secure. You can also activate it and set everything (that is configurable) to nonsecure.
Manufacturer specific
Manufacturers can also make their own components that you can use instead of or together with the SAU. In an ideal world I think this should only be done to augment the SAU's functionality.
However, while working on this project I found out that Nordic gives us exactly 0 SAU regions. So there's no way to use TrustZone in a cross-platform way on Nordic chips, which is very annoying.
For Nordic this special component is called the SPU and STM has the GTZC. Both offer a pretty granular API for setting the security settings for all peripherals.
What should a library for TZ look like?
When setting out to making a library for using all this TrustZone stuff easily I first had to know what I was even building. But what does 'easy' even mean?
So I had a couple of goals in mind. As a user I:
- don't want to care about TrustZone outside of the initial little bit of configuration and the secure-nonsecure boundary;
- want to go back and forth between secure and nonsecure through what looks to me like a standard function call.
I wanted the user to only have to write one application that contained both the secure and nonsecure code. This would be done by having everything default to nonsecure and then annotating every secure function (or the reverse). However, that gets annoying very fast.
After much searching around I found that you can specify the location of a library in a linker script. This gave me the idea that perhaps we could have a secure binary that used a nonsecure library.
However, there were a couple of things I wasn't considering because I had not yet gotten the complete picture as I've described it in this blog post. There were two problems with this approach:
- If the secure and nonsecure codebases both import the same libraries, then only one copy of those libraries will exist after linking. That copy has to either be secure or nonsecure. It can't be both.
- I hadn't realized how the nonsecure-callable regions worked and had made some assumptions. So even if you could link the secure and nonsecure sides together, you still wouldn't be able to just call a function into the other side.
The design in the end
So I couldn't get around the fact that the secure and nonsecure sides can't be linked into the same binary. That leaves one possibility, which is that they each have to be their own binary.
So first off, the secure side is the one that gets booted. This is the normal process, so luckily there we can use the normal cortex-m-rt crate to manage everything. On the nonsecure side, though, something special needs to be done because we don't have a main entry.
What cortex-m-rt does is define the vector table of the chip and with it the reset vector which ends up calling our main. A special thing about this is that the library tells the linker that the reset vector must always be kept. Normally the linker throws everything away that isn't used. But by saying that the reset vector is used, the linker can figure out that the main is used together with whatever other code that is called from main.
When we have no main however, there's nothing being kept. Luckily we do have some other entrypoints in our code, namely the function we want to call from the secure side.
Ok, the first problem is dealt with. The next problem is that if we want to call a nonsecure function from the secure side (or vice versa), we have to know what to call. The linker could've put that function anywhere.
After a lot of thinking, sketching and staring at a wall I came to the conclusion that a vector-table-like construction would be the best. But a vector table also has to have an order and once again the linker is in charge of the order here. So to differentiate between the vectors, a 4 byte hash of the function name is added to the end of each vector entry.
The nice thing about this is that it allows the placement of the required SG instruction in the veneers you must have to transition from the nonsecure to the secure side.
The table of the secure side is placed at the lowest addresses of the non-secure-callable memory region and the table of the nonsecure side is placed at the lowest addresses of the non-secure memory region.
Looking at the macro code generation
So what actually happens when you put one of these fancy derive macros on a function like you saw at the start of a blog post?
Consider this function in the secure side:
#[trustzone_m_macros::nonsecure_callable]
pub extern "C" fn return_5() -> u32 {
    5
}
This gets expanded to:
core::arch::global_asm!(
    ".section .nsc_veneers, "ax"",
    ".global RETURN_5_veneer",
    ".thumb_func",
    "RETURN_5_veneer:",
    "SG",
    "B.w return_5",
    ".4byte 3146409456",
);
#[cmse_nonsecure_entry]
#[no_mangle]
pub extern "C" fn return_5() -> u32 {
    5
}
So first we have some global assembly code that gets placed in the linker section we want. The first instruction is the required SG instruction. As said, this makes the processor switch to the secure mode.
The next instruction simply branches to the function. After that is the hash of the name of the function so we can find this veneer.
The function itself is decorated with #[cmse_nonsecure_entry] which is one of the TrustZone features that the compiler gives us. It makes it so the function branches back to the nonsecure state and cleans up the registers before it returns so no secure data is leaked.
The table for the nonsecure functions (I have named these secure-callable functions) is pretty much the same except that it doesn't have the SG instruction.
Build script code generation
So now it is possible to find and call functions on the other side, but doing that manually every time would be pretty annoying.
So to fix that I've made it so we can generate some bindings. Both binary projects then have a build script like this:
fn main() {
    println!("cargo:rerun-if-changed=build.rs");
    println!("cargo:rerun-if-changed=../memory.x");

    trustzone_m_tools::generate_bindings("../secure/src/main.rs", false).unwrap();
}
And the bindings can be included like this:
include!(concat!(env!("OUT_DIR"), "/trustzone_bindings.rs"));
For the return_5 function it generates a binding like this:
pub extern "C" fn return_5() -> u32 {
    const HASH: u32 = 3146409456u32;
    let fn_ptr = super::find_nsc_veneer(HASH);
    if fn_ptr.is_null() {
        panic!("Could not find the veneer of secure 'return_5'");
    }
    let fn_ptr = unsafe {
        core::mem::transmute::<_, extern "C" fn() -> u32>(((fn_ptr as usize) | 1) as *const u32)
    };
    fn_ptr()
}
So with all of this, we can finally use TrustZone pretty easily! There are some more details that I would love to discuss, but this blog post is already getting long enough. If you have questions, please ask!
The tribulations
Generally it was pretty tough to learn everything. In hindsight it seems rather straightforward how the system works. But while the past has been charted, the future is terra incognita. In the end my conclusion about my work is that I was too quick to make some assumptions, but it all worked out.
The real trouble was once I had set everything up and things just didn't work.
Most peculiar was that everything worked when I stepped through the code in the debugger. I have spent days on this, just trying to figure out what was going wrong and why.
Eventually I found out that this issue occurred when the switchover was made from the nonsecure to the secure side.
So what happened?
It's got to do with the binding code (the first code block above here). First, the pointer to the veneer that we need to call is found. That pointer is then cast to a function pointer and then called.
This is what a branch to a pointer looks like in assembly:
blx r0
Simple, right? But what does this actually do?
- B: Branch, jump to other code
- L: Link, set the LR register so the other code can return to from where it was jumped to
- X: eXchange, make it possible to jump from ARM to Thumb mode or vice versa.
Our processor only supports Thumb mode, so why would the compiler generate a blx here?
Well, there are four branch instructions and they can take different parameters:
- B -> Label
- BL -> Label
- BX -> Label or Register
- BLX -> Label or Register
The non-exchange branch instructions can only branch to a label (like a function), but we're branching using a function pointer that is in a register. So the only option for the compiler is to use an instruction with an exchange.
So how does that work?
All instructions are 16-bit aligned. That means that the least significant bit of a function pointer is not used. The branch instruction (ab)uses that fact. If a pointer is even (the last bit is 0), then it will switch into ARM mode and if the pointer is odd (the last bit is 1), then it will switch to Thumb mode. This is often called the 'Thumb-bit'.
I have never encountered that this was an issue. My guess is that if you take the pointer to a function, it has the thumb-bit already included. However, in my code I invent this new pointer, so apparently it's up to me to add the thumb-bit. You can see the | 1 in the code block and that's all it took to fix everything.
I still have no idea why it worked in the debugger, but I'm glad I could figure out what was going on. But that was only because I had heard about the thumb-bit before.
I had already joked when I was figuring this out that everything was correct except that one bit was probably wrong and I just had to figure out which bit that was. Sadly I was right...
Conclusion
So now there is a repo with all of this code. I've added support for configuring the nRF9160 and its peripherals too.
I would love it if people took a look at it and maybe started using it. We're planning to create a secure bootloader for the nRF9160 in one of our projects with Dutch IoT Solutions.
It has its flaws still and it's not fully complete, but you can find that in the readme.
I'm free to contact if you have any questions or suggestions and if you want to contribute, then you can do that on github.
I hope you've enjoyed reading this.
Want to explore Embedded Rust?
We offer:
- introductory talks
- off-the-shelf workshops
- tailor-made workshops